
This manual explains how to successfully perform your first roast with Cropster Roast.
The Roasting Intelligence (RI4) will only be available for a limited time. We kindly invite you to check the newly improved features of RI5. To upgrade to RI5, please download the Roasting Intelligence (RI5).
Your Roasting Intelligence (RI) needs to be successfully downloaded and configured, also your computer is directly connected to the roast machine before you start performing the actions outlined in this manual.
If you need assistance installing the Roasting Intelligence (RI4) please check our Knowledge base or contact our Support Team. We are here for you.
- Why use the Roasting Intelligence (RI4)?
- Pre-Roasting
- During Roasting
- Finish Roasting
- Setting a Reference Curve
- FAQs
- Contacting Customer Support
Why use the Roasting Intelligence (RI4)?
The Roasting Intelligence (RI4) increases your efficiency and helps you to keep consistency in quality.
With the Roasting Intelligence (RI4), you can visualize and track your roasts and (depending on the machine) replay your Profiles.
Pre-Roasting
Depending on the operating system you use, there are two options to find the Roasting Intelligence (RI4) on your desktop:
- In case of using Windows: Check your program files and look for Cropster Roasting Intelligence.
- In case of using Mac: Check Cropster Roasting Intelligence in your applications.
After completing the first steps of starting with Cropster Roast, you are ready to perform your first roast by following the steps below: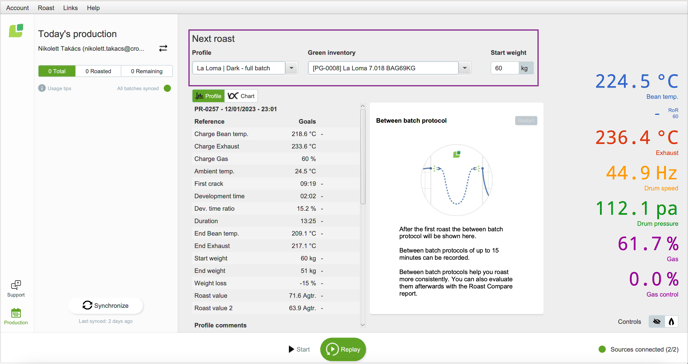
- Log into the Roasting Intelligence (RI4).
- You can select the name of the roast technician by clicking on the two arrows at the top of the left side of the page.
- Click on Synchronize at the bottom of the left side of the page.
💡 Tasks* that are assigned to a roasting machine and can also show up in RI if this option has been enabled by the task issuer.
* The Tasks feature is only available for Professional and higher tiers. -
Select a Profile.
💡 By selecting the Profile, Roasting Intelligence (RI) will automatically select the right Green Inventory and Start weight.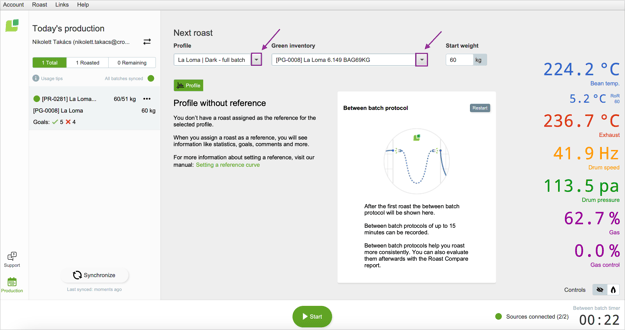
-
After completing steps 3-5, the Start button becomes active. You need to load the hopper with green coffee.
-
Click on Start. Within 30 seconds of hitting the Start button, charge your roaster with beans and the roast will start.
💡 By default, the automatic start and end detection are enabled, so you can start recording the roast first and then charge the coffee. The Roasting Intelligence (RI4) will detect a temperature drop and mark the roast's beginning and the end of the roast as well.
📚 Learn how to set your preferences in the Roasting Intelligence (RI4).
During Roasting
You can see the following information on the roasting screen:
-
Available temperature curves and their values are on the right-hand side of the chart.
-
When enabled, the Rate of Rise (RoR) for all temperature curves.
-
Available machine inputs e.g. gas, pressures.
📝 This feature depends on the machine and connection. -
Modulation chart on the bottom of the graph.
-
Roast duration in the right corner of the screen.
-
Modulation phase timer.
-
Event buttons.
💡 You can click anywhere on the graph to open the comments field.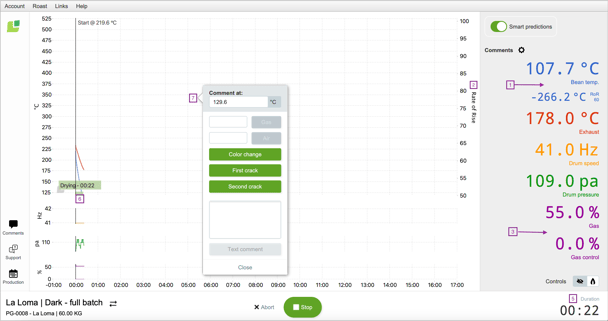
-
- Color Change: Click Color Change to mark the start of the Maillard phase.
- First Crack: Click First Crack and start the development timer and development time % tracking.
- Gas: If your machine does not provide automatic gas tracking through Cropster, you can use this button to track gas changes manually. Just enter the number without the unit (e.g. 40 for 40%) in the comments box and hit Gas to mark the comment.
- Air: Enter the number without the unit (e.g. 20) in the comments box and hit Air to mark the comment.
- Comment: For other information simply type text in the comment box and hit Text Comment.
📚 Learn how to set comments in the Roasting Intelligence (RI) .
Finish Roasting
There are two ways to finish your roast:
- Open the flap:
The Roasting Intelligence (RI4) has an automatic start and end function. After opening the flap, the cool air will trigger the end of the roast.
💡 Automatic start and end detection must be activated to enable the Roasting Intelligence (RI) to perform this action. -
Click on the Stop button and Confirm it within 3 seconds.
Before saving your roast, you can adapt the Profile you've been roasting e.g. by adding the roast times, end weight, color readings, or notes. When you enter all the relevant information click on Save.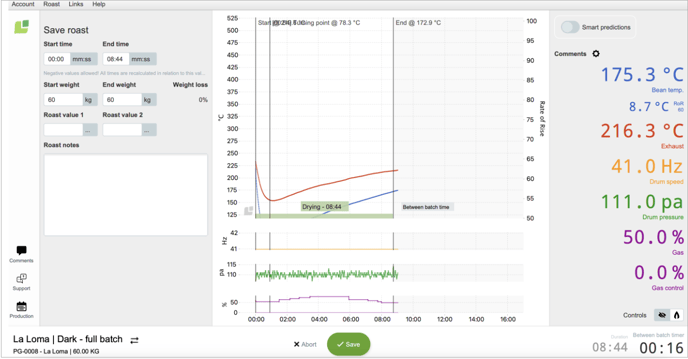
💡 You can also add comments after the roast is done.
Setting a Reference Curve
Once you have developed your Profiles, you can set your Reference Curve.
📚 Learn how to add, edit and archive roast Profiles.
💡We recommend to set a Reference Curve for each of your Profiles to guide you during roasting.
There are four different ways to set a Reference Curve.
By following the steps below you can set a reference curve in Roasting Intelligence (RI4):
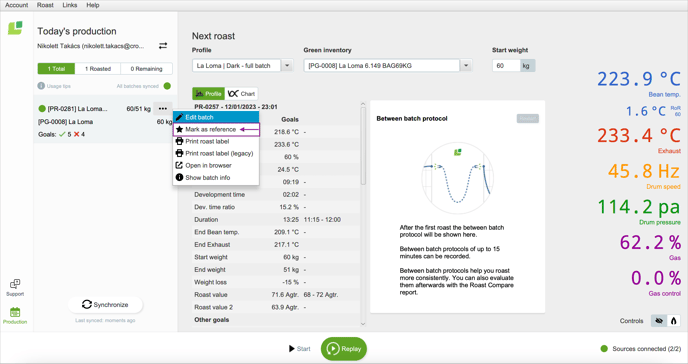
- Open the production bar by clicking the Production icon.
- Select the roasted batch you would like to set as a reference and click the dots (...).
FAQs
Can I customize which information will I see on my screen?
Yes, you can. Navigate to Account > Preferences > Charts and you can edit the information you would like to screen. Click on Save to finalize the changes.
Can I mark events/comments while roasting?
Yes, you can. Simply click anywhere on the graph to open the comments field. Enter the information you would like to log for your roast, either by making a custom comment or clicking the event buttons like Color Change or First Crack. Comments/events are shown as a red vertical line on the graph and saved for further analysis.
What is a Between Batch Protocol (BBP)?
The main goal of a Between Batch Protocol (BBP) is to reset the thermal energy of your machine from the last batch to the start of the next batch. A Between batch protocol (BBP) is tracked from the moment the roast is stopped, upon which you can view the beginning of your roast machine's cool-down phase directly from the RI's Post-roast screen. After having Saved the roast, the recorded BBP will continue to display in the BBP window from the RI's Pre-roast screen for up to 15 minutes.
I can't see any temperatures or other roast machine measurements on the bottom right of the page. What should I do?
Navigate to Account > Preferences > Machine to review your machine settings. Find the value that is not shown and make sure the channel is enabled and that the value and chart are checked as Visible.
If none of the expected measurements are shown log into the online platform C-sar and click on the Gear icon ![]() > Machines. Here you can edit the details of your roasting machine.
> Machines. Here you can edit the details of your roasting machine.
Contacting Customer Support
You can submit a ticket in the Roasting Intelligence (RI4) by clicking on Support on the bottom of the left side of your screen. You need to fill out the Subject* and Description* fields and by clicking on Submit your log files will be automatically attached to your message. Our Customer Support Team will review them and get back to you as soon as possible.
* is indicating mandatory fields.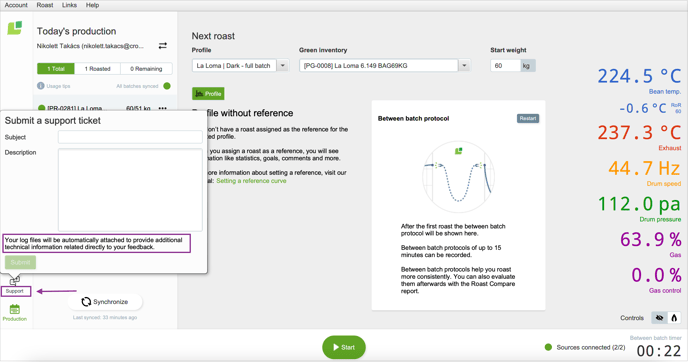
Related content
- Adding a new roast machine
- Roasting Intelligence (RI) Preferences
- What is a Between Batch Protocol (BBP)?
Congratulations! You are now ready perform your first roast with the Roasting Intelligence (RI4)!
Your opinion matters. If you have further questions, feedback or concerns, please feel free to reach out by submitting a support ticket directly from support.cropster.com.
