K-type thermocouples (signal extension connection) Roasting Intelligence setup
This article explains how to connect your roast machine to the Cropster Connector by establishing a signal extension connection to your K-type thermocouple.

Table of Contents
Legal Note
Please read this installation and configuration guide carefully, as any mishandling could lead to permanent device damage.
By connecting a Phidget device or temperature probe to any computer or by installing Cropster’s Roasting Intelligence (RI) software, the user agrees to release Cropster from any liability and assumes any possible risk related to the use of this measuring device and/or software. Cropster's terms of service apply.
Cropster cannot advise on the installation of the hardware, and to ensure safety when installing any hardware on your machine, Cropster recommends consulting with a technician who can help with the installation.
Specifications
Requirements
- 1 x Phidget 1048 Databridge
- 1 x Mini-B USB Cable
- Thermocouple Connector, Flat-Pin Mini, Male Connection, Type K, 800°F Maximum
- Thermocouple Connector, Flat-Pin Mini, Female Connection, Type K, 800°F Maximum
- Stranded Thermocouple Wire, Fiberglass Insulation and Jacket, Type K, 24 Gauge
If you are located in the United States:
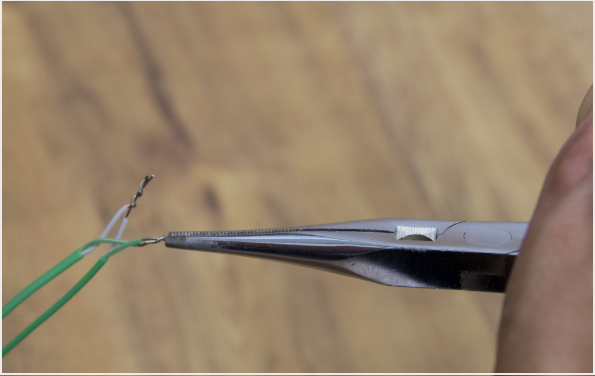
Since the order minimum is 10 ft, you may order one extension wire if you have the tools to clip and strip it to expose the leads for the connections.
Additional requirements
- The wires must be exposed on both ends.
- You will need one full Thermocouple adapter (male + female) and two extension wires per thermocouple you wish to connect to the Phidget.
Hardware installation
Cropster connector installation
Before beginning the installation of the Cropster connector, please ensure that you have completed the following steps:
- Disconnect the USB cable from the Phidget 1048.
- Turn off your roast machine and unplug it from a power source during the hardware installation.
- Carefully detach the cover from the male side of the Thermocouple connector by unscrewing the screws located on its surface. This will expose the adapter terminals.
- Loosen the terminal screws until they are free enough to allow for easy removal.
-
Follow the Bean Thermocouple cable from its mounting point on the front plate to the machine, where you will find the two wires that connect to the internal components.
These wires are usually connected to the back of the temperature readout/PID. -
Examine the wires and their connection points on the machine, paying close attention to the color coding. This will help you accurately identify how the wires are connected.
The colors will help you identify the polarity of each wire. For K-type thermocouples, colors yellow and red: Yellow = Positive +, Red = Negative -. - Carefully connect the Thermocouple wires to the adapter terminals, ensuring a secure and correct attachment.
- Secure the adapter cap back on.
-
Carefully take an extension cable and securely splice or twist it to the exposed leads of another extension cable, making sure to maintain the correct polarity.
- Using the twirled end from the extension cables, follow these steps again with the other adapter component (female) to secure the twirled cables into the adapter's terminals based on polarity.
- Connect the male component of the adapter to the female component.
- Using one of the extension wires (coming out of the female end of the adapter), connect the lead back to the machine's readout (e.g., PID).
- Connect the lead from the second extension cable to any available channel on the Phidget 1048. (e.g. 0/G, 1/G, 2/G, 3/G)
- Connect the USB Cable to the Mini-B USB port on the Phidget 1048, and the other end to your computer.
Roasting Intelligence (RI) Setup
Installing the Roasting Intelligence (RI) software
- Download Roasting Intelligence.
- Complete the installation process by following the steps provided.
- Download the Phidget driver.
- Double-click the Cropster icon on your desktop to access Roasting Intelligence.
-
Click the green Login with the browser button.

-
You will be directed to the C-sar browser.

-
Enter your Username* and Password* and click the green Sign in with password button.
Use the same credentials that you use to access the online platform C-sar.
Establishing a connection to the machine
The images below are for reference and may vary slightly from your screen.
Important details to keep in mind:
- Before you start configuring your roast machine, ensure that you have added it via the online platform C-sar.
- Only click Save after you've completed all settings in Roasting Intelligence.
- Select
 Preferences > Machine > Configuration
 - To choose the Roast machine, click on the dropdown menu in the Machine section.
- Click the + Add connector option to choose your connector from the dropdown list.
- Select Temperature sensor (Ungrounded K/J/E/T-type thermocouples) from the dropdown.
-
Click Select to add the connector.

- Navigate to the Machine > Measurements tab. All supported measurements will be displayed.
- To activate the measurements, simply click the green toggle button.
- Enable the desired measurements and choose Temperature sensor (Ungrounded K/J/E/T-type thermocouples) as the connector type.
-
Select the Channel and Type.
The channel refers to the ports on the Cropster Connector. If the probe wires are connected to port 1/G, select 1 under the channel. - (Optional) Click the toggle button to turn on (or off) the Rate of Rise (RoR) curve for your measurements.
- (Optional) Change the order of the measurements by using the
-png.webp) Drag and Drop icon and move it into position.
Drag and Drop icon and move it into position. -
Click Save to finalize the changes.

- Restart Roasting Intelligence. If the setup was successful, you will see the temperature values displayed on the right-hand side of the screen following the restart.

Learn more about the Roasting Intelligence Preferences.
Troubleshooting
If Roasting Intelligence indicates No source connected and/or you cannot see any measurements, please check the following:
- Is the Cropster Connector connected to the computer?
- Is the Phidgets driver installed?
- Mac only: Have the Phidgets been enabled in the Mac's Security & Privacy settings?
Congratulations! You have successfully set up the Cropster Roasting Intelligence.
Your opinion matters. If you have further questions, feedback, or concerns, please submit a support ticket directly from support.cropster.com.