
This article will explain how to use the cupping app Cropster Cup.
Cropster Cup is no longer available via Google Play Store for download (from 2023-05-01 onwards). If you have downloaded the app from Google Play Store before 2023-05-01, the app will remain functional. Cropster Cup app will remain available via the App Store until further notice.
We recommend to use the web-app version of Cropster Cup via cup.cropster.com to not miss any important updates.
The current version of the web-application does not run offline, but we will add that functionality in the near future.
Cupping sheets
📚 Learn more about the custom cupping sheet requirements.
Cropster Cup has a wide array of forms available for you to log your information.
|
Available across all subscription tiers. |
 |
|
Available on the following subscription tiers: |
 |
|
|
 |
If the available sheets do not match your needs, contact hello@cropster.com.
We would be happy to create a custom cupping sheet for you.
Accessing Cropster Cup
Cropster Cup is available as web-app via cup.cropster.com.
- Open the browser on your mobile device and navigate to cup.cropster.com.
- Login using your Cropster credentials.

- If no groups are loaded, click the Reload button to initiate the account sync.

- If you are member of one group, you will enter the group automatically. If you are member of more than one group, you will have to select the group you would like to cup for.
If you are not directed to your account after clicking the reload button, please contact your Account Administrator to verify if your user has been granted the "Use Cropster Cup" permission.
📚 Learn more about how to add and remove users (user permissions)
Cupping sessions
- After entering the group you will be forwarded to your dashboard.
- If there are any open Cupping Sessions, they will immediately appear under the Open sessions tab (up to 25 sessions).
- Once you have completed a cupping session, you can switch to the Completed sessions tab to review your results.
Open sessions show up within Cropster Cup as long as they are open.
Completed sessions will disappear after 30 days from the cupping app.
Creating a session
There are two ways to create a session:
- Via the online platform C-sar then synchronizing it to Cropster Cup.
- Via the web-app directly.
Some advanced features are available on Cropster Lab and Cropster Roast Professional and higher tiers. Advanced session features are indicated with a * below.
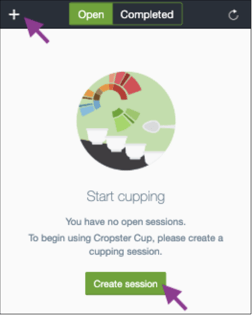
- To create a new session within the web-app, tap the + Plus icon at the top or the Create session button on the dashboard (when there is no open session).
- Enter the session's details:
- Name: Give your session a name so it's easier to find.
- Sheet*: Select a cupping sheet you want to use.
- Lab: Track samples across multiple labs.
- Setting*: Choose between Blind and Non-blind.
- Label*: For blind cuppings, choose between alphabetical (A, B, C), numerical (1, 2, 3) or three-letter (ABC, DEF, GHI) labels.
- Samples: Search and add lots. All SG-, PG-, SR- and PR-lots used within the last 6 months are available for cupping.
- Once you have finished the setup, tap Start cupping to enter the session.
- If you are not yet ready to cup, tap
 Back to get to the dashboard and enter the session at a later point.
Entering Scores
Enter a session you are about to cup.
- Search for the lot you would like to enter a cupping score for.
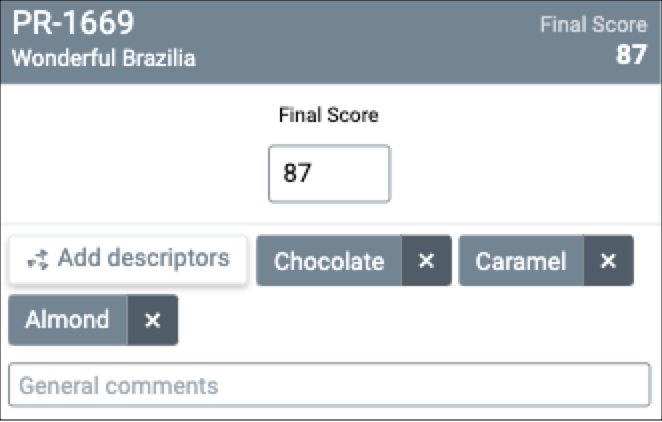
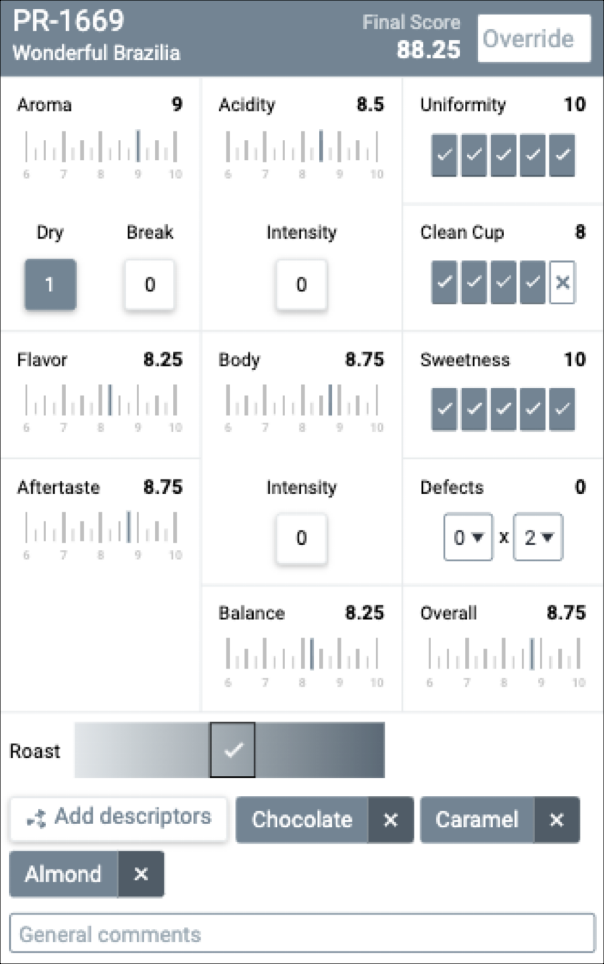
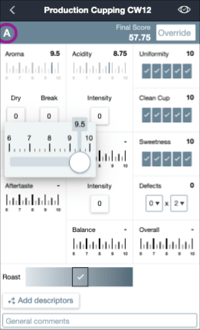
- Tap the category you would like to score to open the input-modal and select the score.
- You can enter descriptors by tapping on the Add descriptors button start typing. Select a predefined descriptor or add a new custom descriptor.
💡Custom descriptors have a character limit allowing up to 80 characters. Custom descriptor exceeding the limit will prevent the data from being synchronized to your account.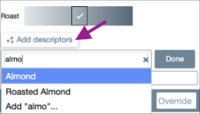
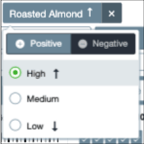
- By tapping on a logged descriptor you can add Intensity and/or mark your descriptor as Negative/Positive.
- You can review your results at any time by tapping the Review button top right. Click Back to get back to your input screen.
- Once you are happy with the result, click Submit to sync your scores with the cloud.
No changes can be made from Cropster Cup after the session has been submitted. If any changes need to be applied after the session has been submitted, this can be done via the online platform C-sar.
Completed sessions
After the scores have been submitted, the session will move to the Completed tab and will be available for review for 30 days.
After 30 days, the session will be wiped from Cropster Cup. You are still able to review the session via the online platform C-sar under Quality > Cupping sessions.
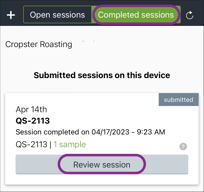
By following the steps below you can review a submitted session in Cropster Cup:
- Switch to the Completed sessions tab.
- Look for the session you would like to review.
- Click Review session to view your scores.
- Scroll down to the Other submitted sessions section to see sessions you have submitted from a different device or from the online platform within the last 30 days.
💡Results for these sessions can only be reviewed online.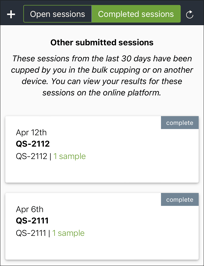
If you log out of the Cropster Cup app, the session data from the completed sessions is wiped out and reloaded from our server.
You will be able to see the completed sessions below the Other submitted sessions, though we do not load the details of the submitted session for review.
Related content
- Creating a Sensorial Session
- How to add a guest evaluator to my cupping panel
- Using the Cropster Cup via the browser
- Setting up a double-blind cupping session
Congratulations! You are now ready to use Cropster Cup (Cropster Cup 101).
Your opinion matters. If you have further questions, feedback, or concerns, please feel free to reach out by submitting a support ticket directly from support.cropster.com .