
This manual covers the hardware connection, software installation and settings of Cropster’s Roasting Intelligence for J/K/E/T/N type (UNGROUNDED) thermocouples, connected via a Yocto-Thermocouple device.
This roast machine is currently in the Beta stage of development at Cropster.
To access this integration, please register for Beta testing by completing the provided form here.
Beta testing involves the evaluation of new features by a limited group of users to uncover potential minor issues that may not be apparent during internal testing.
Your feedback is crucial in helping us improve the functionality of our product. Please let us know in case you come across any unexpected behavior.
We will be happy to assist in resolving any issues you may encounter or propose alternative connection options.
We recommend reviewing the Yocto-Thermocuple's User's Guide, before proceeding with the steps provided in this article.
Legal Note
Please read this installation and configuration guide carefully, as any mishandling could lead to permanent device damage.
By connecting a Phidget device or temperature probe to any computer or by installing Cropster’s Roasting Intelligence (RI) software, the user agrees to release Cropster from any liability and assumes any possible risk related to the use of this measuring device and/or software. Cropster's terms of service apply.
Cropster cannot advise on the installation of the hardware, and to ensure safety when installing any hardware on your machine, Cropster recommends consulting with a technician who can help with the installation.
Yocto-Thermocouple contents
- Yocto-Thermocouple device
- 2 Type-K 50cm fine-wire twisted-pair thermocouple cables
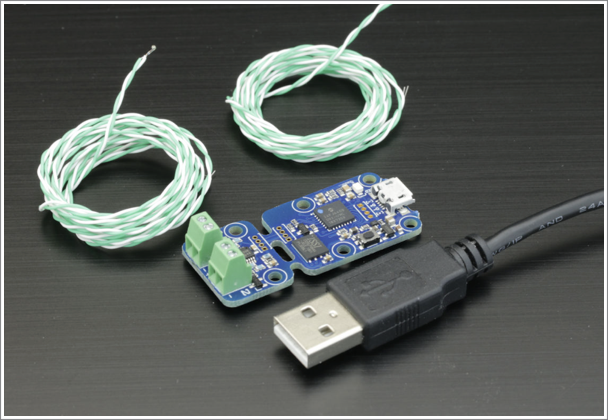
Yoctopuce's Yocto-Thermocouple.
The USB 2.0 Type-A to Micro-B data cable, shown in the picture above, is sold separately from the Yocto-Thermocouple device.
💡 We recommend ungrounded thermocouples type K, J, T, E, or N.
Specifications
Requirements
- Ungrounded, digital, thermocouples type K, J, T, E, or N
📚 Learn how to identify your thermocouple type.
- Yocto-Thermocouple device
- USB 2.0 Type-A to Micro-B data cable
As shared by Yoctopuce, the Yocto-Thermocouple device requires a USB 2.0 Type-A to Micro-B cable with data connectivity, for a connection to a computer.
💡 Make sure not to buy a simple USB charging cable without data connectivity. The supported cable type is available from the Yoctopuce shop.
Connection options
Depending on the type of your roaster and thermocouples, there are two connection options:
Direct connection
A direct connection applies when adding new probes independently from the roaster's readout. The newly added probe can be connected directly to the Yocto-Thermocouple device.
Proceed with the Yocto-Thermocouple Device Installation.
Dual connection
A dual connection applies when the roaster is equipped with a dual probe. A dual probe is a probe with two sensors inside the hull and two pairs of wires that allow a simultaneous connection to the Yocto-Thermocouple, and the roast machine's readout.
💡 If your machine has single probes, you may replace the probes with dual ones, to allow for a dual connection.
Proceed with the Yocto-Thermocouple Device Installation.
Yocto-Thermocouple Device Installation
Disconnect the USB cable from the Yocto-Thermocouple device and turn off your roast machine during the hardware installation.
Yoctopuce does not recommend connecting USB devices through two cascaded (interconnected) hubs without an external power supply. To cascade hubs, it is necessary to use self-powered USB hubs, that provide a full 500mA to each support.
📚 Learn more about USB power distribution from Yoctopuce's User's Guide.
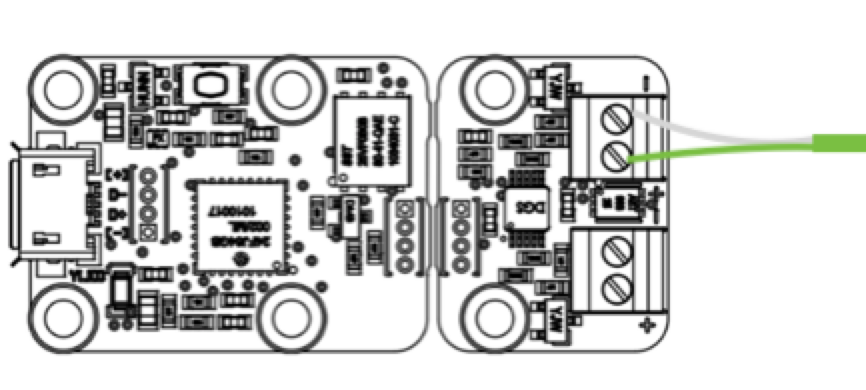
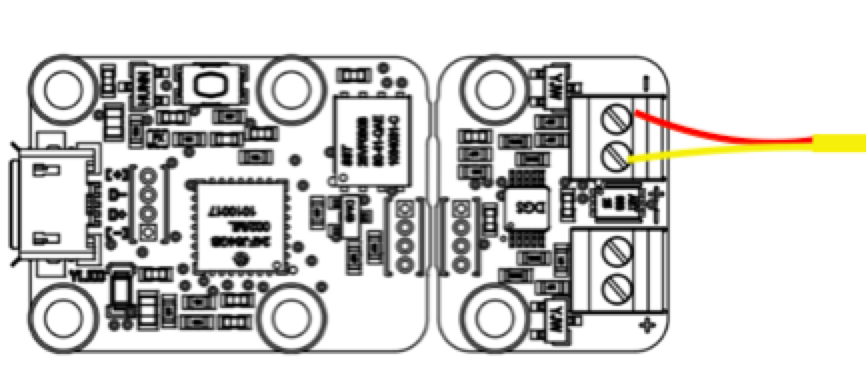
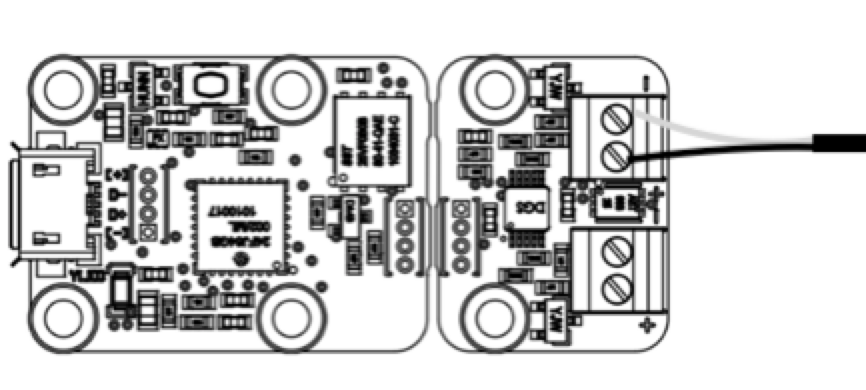
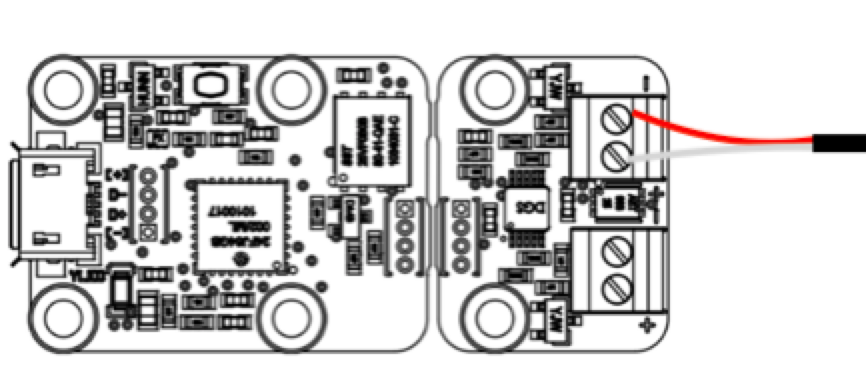
- Follow the probe cable from the tip of the probe to its end, where the two wires appear. In the case of dual probes, take the free end that is not connected to the roast machine.
- Connect the two wires from the probe, by polarity, to any channel of the Yocto-Thermocouple device with a screwdriver, as shown in the table below. Refer to the Yocto-Thermocouple's ports, for the +/- symbols.
- Connect the Yocto-Thermocouple device to the computer with a USB-A cable.
- To enable RI to connect to the Yocto-Thermocouple device, download and run the VirtualHub application provided by Yoctopuce here and then proceed to Roasting Intelligence Setup.
| EURO-standard | US-standard |
|
K-type
|
K-type
|
J-type
|
J -type
|
Roasting Intelligence (RI) Setup
Installing the Roasting Intelligence (RI) software
-
Download the custom version of Roasting Intelligence depending on your computer's Operating System here.
-
Complete the installation process by following the steps provided.
- Double-click the Cropster icon on your desktop to access RI.
-
Enter your username and password.
Use the same login information that you use to access the online platform C-sar. - Click the Login button.
Check out the Release notes for every version of RI5 to stay updated on the latest features and improvements.
You can access the Release notes directly in RI by clicking on Help > Release Notes.
Establishing a connection to the machine
- If you are setting up RI for the first time, click the Select machine button in the banner at the top or click
 Preferences > Machine > Configuration bottom left to access the Preferences screen.
📚 Learn how to use the keyboard shortcuts in RI. - To choose the Roast machine, click on the dropdown menu in the Machine section.
💡 After selecting the machine from the dropdown menu, the roast machine settings may automatically be filled in. You have the flexibility to edit these settings at any time to ensure they align with the specifications of your roasting machine.
📚 Learn how to add a new roast machine. - After selecting the machine all supported measurements will load.
Change the order of the measurements by using the-png.png?width=16&height=16&name=DragAndDropIcon%20(1)-png.png) Drag and Drop icon and move it into position.
Drag and Drop icon and move it into position. - Switch on the measurements you would like to enable and select Yocto-Thermocouple from the dropdown.
💡 Make your measurement readouts more compact. Choose the size of your measurement readouts by selecting either the Small or Large view for display.
- Select the Channel.
💡The channel refers to the ports on the Yocto-Thermocouple device.
Yocto-Thermocouple schematic, available from the Yocto-Thermocouple User's guide. - Select the Type of thermocouple.
📚 Learn to identify the probe type. - (optional) Click the toggle button to turn on (or off) the Rate of Rise (RoR) curve for your measurements.
📚 Learn how to set the RoR within the RI.
- Click Save to finalize the changes.
- After saving the changes, RI will automatically restart. If the setup was successful, you will see the temperature values displayed on the right-hand side of the RI screen following the restart.
📚 Learn more about the Roasting Intelligence (RI) Preferences.
Troubleshooting
If the RI indicates No source connected and/or you cannot see any measurements, please check the following:
- Is the Yocto-Thermocouple device connected to the computer?
- Are the thermocouples connected to the Yocto-Thermocouple device?
- If your Yocto-Thermocouple is connected by USB, and its blue LED is on, but if the operating system cannot see the module, check that you are using a true USB cable with data wires, and not a charging cable. Find the appropriate cable from the Yoctopuce shop.
If Roasting Intelligence shows negative temperature readings, you will have to swap the wires on the board from the positive (+) port, to the negative (-) port, and the other way round.
Erratic temperature curves (electrical interference)
An erratic, or noisy temperature curve, is a common issue in PC-based, temperature-logging systems, and can originate from different sources:
- Sensor noise
- Signal wire noise
- Ground loops
- etc.
📚 Learn more about:
The Yocto-Thermocouple, is not an electrically isolated module; there is no electric separation between the measuring part, and the USB part.
This has consequences, as explained by Yoctopuce's article "The Yocto-Thermocouple and ground loops".
Congratulations! You have successfully set up the Cropster Roasting Intelligence!
Check out the Roasting Intelligence (RI5) - Getting Started manual and enjoy tracking your first roasts! More manuals and videos can be found on help.cropster.com.