
This manual covers the connection of the Probat Sample Roaster (PIII series) to Cropster's Roasting Intelligence.
Specifications
Requirements
- Ethernet cable
- RI 4.11.3 or higher
Supported measurements
- Bean temperature
- Exhaust temperature
- Drum pressure (pa)
- Gas (%)
- Gas Control
Setting up a connection
For Probat Sample Roaster a connection via the network router is recommended.
Via the network router

- Connect your roaster with an ethernet cable to your network router.
💡The DHCP server assigns an IP address to your roaster. The IP address appears in the top bar on the roaster's display.
The IP address and DNS name of your Probat differ from the screenshot. - Make sure that your computer is connected to the local network.
- Proceed with the Roasting Intelligence (RI) Setup.
Via the computer
To access the web interface and configure a static IP address, Probat Sample Roasters requires a connection via the network router for the first connection.
- Connect your roaster with an ethernet cable to your network router, as described under this manual's Via the network router-section.
- Check the IP address on your roaster's display.
- Open your browser and enter the IP address that appears on the Probat display in the address bar of your browser to access the IP settings.

- Go to Settings > General and change the Configuration from DHCP to Manual.

- Restart the roaster.
- Disconnect the roaster from the network router and connect it to your PC.
- The IP address should be shown on the display.
- Proceed with the Network settings.
Network settings
When the roaster is connected to the computer directly, you need to set up a Static IP address.
Static IP address configuration - Windows 7, 8, 10
- Navigate to the Control Panel > Network and Sharing Center or Network and Internet > Network Sharing Center.
- Click Change adapter settings.
- Identify the Network connection item that refers to the connection to your machine and select that item.
💡If you are not sure which icon refers to the roast machine, simply disconnect and reconnect the Ethernet cable and check which icon changes its status. - Right-click on WiFi or Local Area Connection.
- Click Properties.
- Select Internet Protocol Version 4 (TCP/IPv4).
- Click Properties.
- Select Use the following IP Address option.
- Enter the specific IP Address for your roaster and replace the fourth number block with 42:
- IP Address: 10.20.0.42*
Important: The first three blocks of the IP address need to match the IP address of your roaster, as identified via the roaster's panel. - Subnet mask: 255.255.255.0
- Leave the rest blank.
- IP Address: 10.20.0.42*
- Click the OK button to submit your changes.
- Proceed with the Roasting Intelligence (RI) Setup.
Static IP address configuration - MacOS
- Navigate to
 > System Settings > Network.
 - Identify the Network connection item that refers to the connection to your machine and select that item.
💡If you are not sure which icon refers to the roast machine, simply disconnect and reconnect the Ethernet cable and check which icon changes its status.
- Click on Details...

- Open the TCP/IP section and choose Manually next to Configure IPv4.
- Enter the specific IP Address for your roaster and replace the fourth number block with 42:
- IP Address: 10.20.0.42*
Important: The first three blocks of the IP address need to match the IP address of your roaster, as identified via the roaster's panel. - Subnet mask: 255.255.255.0

- IP Address: 10.20.0.42*
- Click the OK button to confirm the changes.
- Proceed with the Roasting Intelligence (RI) Setup.
Roasting Intelligence (RI) Setup
Installing the Roasting Intelligence (RI) software
-
Download RI.
-
Complete the installation process by following the steps provided.
- Double-click the Cropster icon on your desktop to access RI.
- Click the green Login with the browser button.
💡 Select the "Remember me on this device" option to save your login credentials for future access.
- You will be directed to the C-sar browser.

- Enter your Username* and Password* and click the green Sign in with password button.
💡You need to use the same credentials that you use to access the online platform C-sar.
Check out the Release notes for every version of RI5 to stay updated on the latest features and improvements. You can access the Release notes directly in RI by clicking on Help > Release Notes.
Establishing a connection to the machine
The images displayed below are meant to serve as reference examples; however, they may differ slightly from what you will see on your screen.
Before you begin configuring your roast machine, ensure that you have added it via the online platform C-sar.
- Click
 Preferences > Machine > Configuration bottom left to access the Preferences screen.
 -
To choose the Roast machine, click on the dropdown menu in the Machine section.
-
By clicking on the + Add connector option, you can choose your connector from the available options in the dropdown list.
- You need to select Probat Websocket (P III Series) from the dropdown.
- Click Select to add the connector.

-
Navigate to the Machine > Measurements tab. All supported measurements will be displayed.
-
To activate the measurements, simply click the green toggle button.
-
Switch on the measurements you would like to enable and select Besca Auto PLC from the dropdown.
💡 Make your measurement readouts more compact. Choose the size of your measurement readouts by selecting either the Small or Large view for display. -
Change the order of the measurements by using the
-png.png?width=16&height=16&name=DragAndDropIcon%20(1)-png.png) Drag and Drop icon and move it into position.
Drag and Drop icon and move it into position.
-
Navigate to the Machine > Controls tab.
-
To activate the controls, simply click the green toggle button. Enable the controls you wish to activate.
-
Choose the appropriate connector option that you selected in Step 8.
-
Change the order of the Slider controls by using the
Drag and Drop icon and move it to position. - Navigate back to the Machine > Configuration tab and click on the
 Gear icon in the Connector setup section next to the previously added connector to open and configure more PLC settings.
 - Enter the IP address from the Probat display.
💡The IP address of your Probat differs from this screenshot. If the IP address is shown as 0.0.0.0, you are not connected properly. Please check your connection.
- Click OK.
- Click Save to finalize the changes.
After saving the changes, RI will automatically restart. If the setup was successful, you will see the temperature values displayed on the right-hand side of the RI screen following the restart.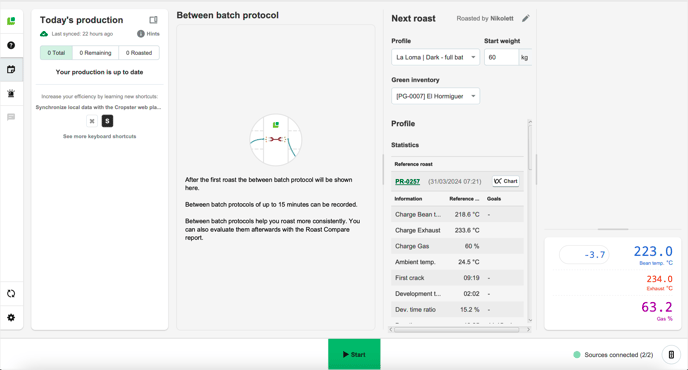
📚 Learn more about the Roasting Intelligence (RI) Preferences and roasting with the Controls and Replay Assist features.
Troubleshooting
If the RI indicates No source connected and/or you cannot see any measurements, please check the following:
- Is the IP address correct?
When using Replay Assist, do not use the Probat Pilot roaster shop or any other temperature-controlling software in parallel.
Any gas/airflow changes from a concurrent client disable Replay Assist for the remainder of the roast.
Congratulations! You have successfully set up the Cropster Roasting Intelligence!
Check out the Roasting Intelligence (RI5) - Getting Started manual and enjoy tracking your first roasts! More manuals and videos can be found on help.cropster.com.