Dutch Master Roasters DMR models - Roasting Intelligence Setup
This manual covers the connection of the Dutch Master Roasters DMR roaster to Cropster's Roasting Intelligence.

Table of Contents
Specifications
Requirements
- Ethernet cable
-
To use the Dutch Master Roasters integration, the roaster's software requires the following minimum software versions:
- App version 5.x.x
- Backend version 5.x.x
- PLC version >= 2.35.
The software versions are shown in the Dutch Master Roasters app, in the bottom left-hand corner of the screen (can be seen in the first screenshot located below).
If your PLC version is less than 2.35, a manual update of the PLC software needs to be done by Dutch Master Roasters. For more information regarding the update, please contact info@dutchmasterroasters.com
Additional Requirements
To effectively manage the roaster using the Roasting Intelligence control sliders, it is essential to fulfill the following requirements:
When the 'Remote control' is activated, the roast graph will no longer appear in the Dutch Master Roasters app. Instead, you should refer to the graph displayed in Roasting Intelligence (RI) for monitoring your roasting process.
-
To control the roaster using the Roasting Intelligence Control Sliders:
-
The setting "Remote control" needs to be enabled in your Dutch Master Roasters App.
.webp)
-
The setting "Remote control" needs to be enabled in your Dutch Master Roasters App.
-
The button "Roaster" needs to be turned on (lit up in green):
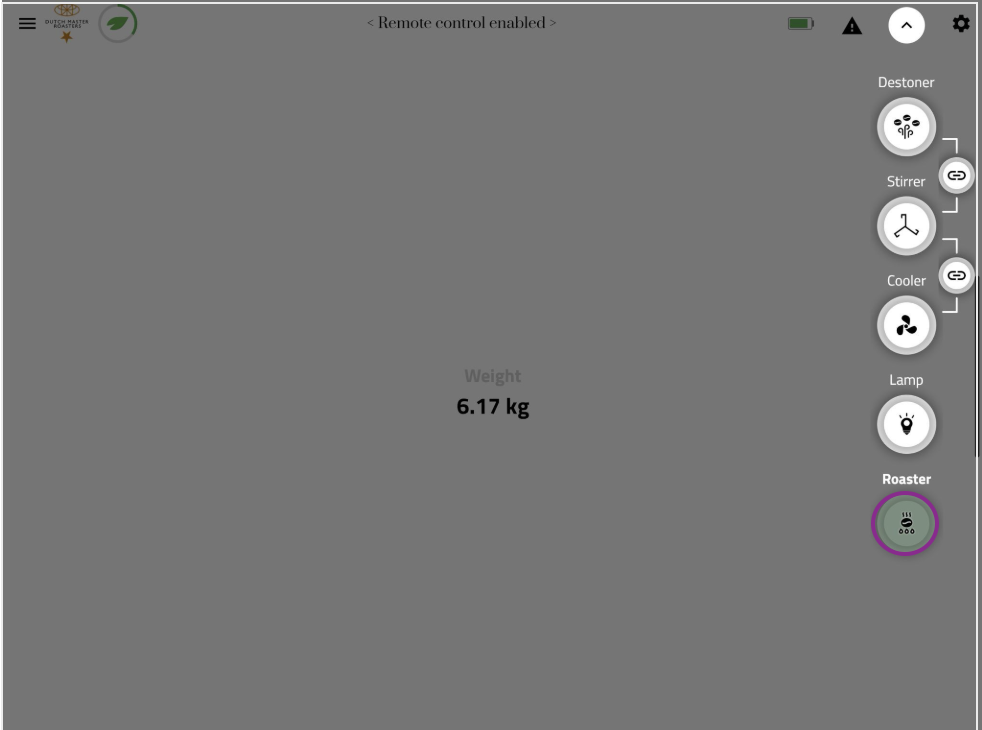
-
In Roasting Intelligence, you can switch between the Gas Control slider and the Set Temperature Control slider using the "Auto" toggle.

Supported measurements
- Bean temperature
- Exhaust temperature
- Other temperature: Optional Bean temperature IR sensor.
- Gas (%)
- Drum pressure (Pa)
- Drum speed (RPM)
- Fan speed (%)
- Gas control (%)
- Drum Pressure control (Pa)
- Drum speed control (RPM)
- Set temperature control
Setting up a connection
Via the computer
.webp)
- Connect the computer to the Ethernet port at the side of the DMR roaster with an Ethernet cable.
- Configure the computer’s network device to obtain the IP address dynamically (DHCP).
- Proceed with the Roasting Intelligence setup.
Roasting Intelligence Setup
Installing the Roasting Intelligence software
- Download Roasting Intelligence.
- Complete the installation process by following the steps provided.
- Double-click the Cropster icon on your desktop to access Roasting Intelligence.
-
Click the green Login with the browser button.
.webp)
-
You will be directed to the C-sar browser.
.webp)
-
Enter your email and password and click the green Sign in with password button.
Use the same credentials that you use to access the online platform C-sar.
Establishing a connection to the machine
The images below are for reference and may slightly differ from your screen.
Important details to keep in mind:
- Before you start configuring your roast machine, ensure that you have added it via the online platform C-sar.
- Only click Save after you've completed all settings in Roasting Intelligence.
- Select
 Preferences > Machine > Configuration
 - To choose the Roast machine, click on the dropdown menu in the Machine section.
- Click the + Add connector option to choose your connector from the dropdown list.
- Select Dutch Master Roaster PLC from the dropdown.
-
Click Select to add the connector.

- Click on the Gear icon in the Connector setup section to open and configure more settings.
-
The default IP address of your roaster should show: 192.168.3.159
Please note: The IP address of the roaster is fixed and cannot be configured. -
Click OK.

- Navigate to the Machine > Measurements tab. All supported measurements will be displayed.
- To activate the measurements, simply click the green toggle button.
- Enable the desired measurements and choose Dutch Master Roaster PLC as the connector type.
- (Optional) Change the order of the measurements by using the
-png.webp) Drag and Drop icon and move it into position.
Drag and Drop icon and move it into position. -
Click Save to finalize the changes.

- Restart Roasting Intelligence. If the setup was successful, you will see the temperature values displayed on the right-hand side of the screen following the restart

Learn more about the Roasting Intelligence Preferences.
Troubleshooting
If Roasting Intelligence indicates No source connected and/or you cannot see any measurements, please check the following:
- Check in the Dutch Master Roasters app that all minimum system requirements are met.
If you have further questions, feedback, or concerns, please submit a support ticket directly from support.cropster.com.