
This article describes how to create products and orders for Roast Professional accounts.
If you are using Commerce, please refer to the following manuals:
Relevant for the following products:
- Roast Professional
Commerce settings
Firstly, define the units you sell and check the scheduling preferences.
Setting up the units
If you don't see your unit in the list, please create a support ticket and request the unit to be added to the list. It will roughly take us 1-2 weeks for the unit to be added.
- Log into the online platform C-sar.
- Navigate to
-png.png?width=16&height=16&name=SettingsIcon%20(4)-png.png) Settings on the top right side of the page.
Settings on the top right side of the page. - Select Commerce settings.
- Check the box next to the units you sell.
- Your changes will be automatically adopted.
Customizing your scheduling preferences
Define how you would like to sort your roast schedule when converting orders.
- Switch to Scheduling Preferences tab in the menu bar on the left hand side.
- Under Order by you can define if you want to order your scheduled orders by Profiles or Batch size
- Profiles: Define the order of your profiles below, by dragging and dropping them into position.
- Batch size: Select if you want to roast from small to large (small batches first) or large to small (large batches first).
- Click Save changes.
Products
Creating products
You need to have Profile groups in order to map the products. Learn how to maintain Profile groups.
- Go to Commerce > Products.
- Click + Add Product.
- Enter the product details:
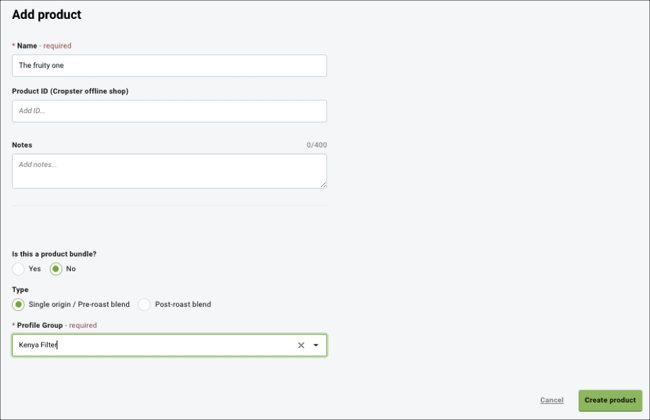
- Name: Give your product a name.
- Product ID: The Product ID can serve as a reference to your external shop.
- Notes: Add any additional notes.
- Is this a product bundle?: Select No to create a individual product.
Note: Learn how to create Product bundles. - Type: Define whether your product is a Single origin / Pre-roast blend or Post-roast blend.
- Profile group / Blend profile: Link your product to a Profile group (for Single origins or Pre-roast blends) or a Blend profile for Post-roast blends.
- Click Create product.
Assigning on-hand inventory
Once you have created all your products, you can assign on-hand inventory.
On-hand inventory is stock you have already fully packaged and ready to be shipped in your shelves. The on-hand inventory will be deducted from the total amount to roast in order to fulfill your ordered amounts.
On-hand inventory does not automatically update and needs to be updated manually before you schedule your orders.
If you are looking into a solution on how to manage your Roasted Inventory, sign up for a free trial of Commerce.
- Go to the Commerce > Products.
- Click the Scale
.png?width=16&height=16&name=WeightIcon%20(1).png) icon next to the product you want to add on-hand inventory.
icon next to the product you want to add on-hand inventory. - Add the total weight of the packaged stock that is ready to be shipped.
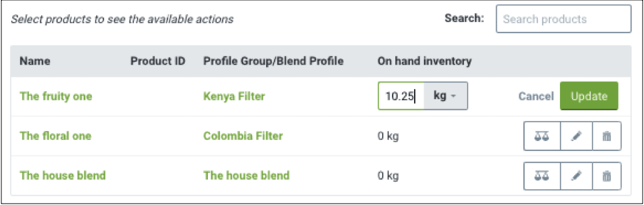
- Click Update to save.
- Repeat the steps for each product you have on stock.
Creating Product bundles
You need to create all the components of a bundle first as an individual product.
- Go to Commerce > Products.
- Click + Add Product.
Alternatively, switch to the Product Bundles tab and click + Add product bundle. - Enter the product details:

- Name: Give your bundle a name.
- Product ID: The Product ID can serve as a reference to your external shop.
- Notes: Add any additional notes.
- Is this a product bundle?: Select Yes to create a bundle.
- Products: Link the products that are part of the bundle.
- Click Create product.
Creating Orders
You are now ready to manually input your orders to Cropster.
- Go to Commerce > Orders.
- Click + Add Orders > Order top right.
- Enter the general order details:

- External Reference: Enter an external ID number e.g. from your online shop.
- Order date: Enter the order date and time
- Customer type: Choose the customer type (Wholesale or Retail)
- Customer: Name of the business/person who placed the order.
- Sales person: Enter a Sales person
- Enter the ordered products:
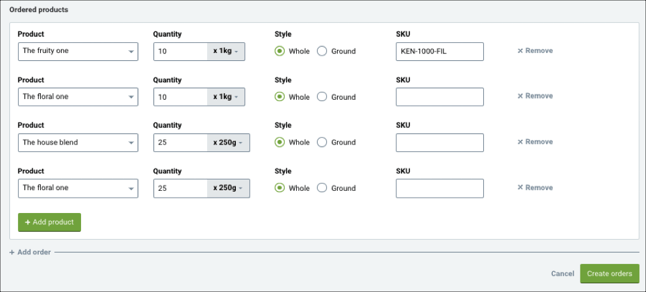
- Product: Choose the products ordered from the drop-down menu.
- Quantity: Select the unit from the drop-down menu and enter the ordered amount.
- Style: Select whole beans or ground coffee.
- SKU: Enter the SKU if needed.
- Add another product by clicking the + Add product button.
- If you want to add another order, click + Add order and repeat the steps from above.
- When you are done, click Create orders to submit.
- Your orders are now visible under the Received tab on the Orders overview page. Each order receives an individual ID-Tag starting with OR-.

📚 Learn how to fulfill your orders.
Related content
 Congratulations! You are now ready to create Products and Orders.
Your opinion matters. If you have further questions, feedback, or concerns, please feel free to reach out by submitting a support ticket directly from support.cropster.com.