Managing Locations
This article explains how to set up and manage your Locations.
Table of Contents
You need to have the Group Administrator's permission to perform the steps outlined in this article.
Why set up a Location?
Setting up one location or more locations will allow you:
- Monitor and manage your green lots and roasts across different warehouses, transportation hubs, and roasting facilities.
- Designate specific locations for your lots and roasts to effectively monitor and log all associated activities.
- Track the timing of lots moving between warehouses or coffees in transit from the origin to the warehouse.
Adding a Location
The Cafe location should only be used if you have an active Cafe subscription.
By following the steps below, you can add a location:
- Log in to the online platform C-sar.
- Navigate to the More section on the main menu bar and select Locations.
- Click on +Add location.
-
Enter the following information:
* indicates mandatory fields.- *Name
-
*Location type
You can choose between the location types listed below:- Roastery
- Cafe
- Warehouse
- Lab
- Farm
- Mill
- Other: You can also create a virtual location to keep track of your contracted lots.
- *Country
- City
- Time zone
- Street
-
Zip code

- Click on Create location.
If you added the location after setting up machines and green lots, it is essential to assign the roast machines and green lots to the new location to ensure proper management and tracking.
Assigning a roast machine to a Location
- Log in to the online platform C-sar.
- Navigate to the
 Gear icon in the top right corner and select Machines.
 - Click on the
-png-1.webp) Edit icon at the corresponding roast machine you would like to edit.
Edit icon at the corresponding roast machine you would like to edit. -
Finalize the change by clicking on Update location.

Assigning the green lots to a Location
Assigning green lots to a location involves utilizing the 'Warehouse Distribution' feature.
By following the steps below, you can assign the green lots to a location:
-
Select the checkbox next to the lot you want to reassign, then click the Warehouse distribution button located on the right side of the page.

-
You have two options to assign your lots:
- Enter the weight you would like to move to a certain location in the weights field under the respective location.
-
Select the All to option at the bottom of the page if you would like to move your whole inventory to a specific location.
You can also select an initial location for the unassigned lots.
- Click the green Update button. A new lot with the same ID tag will be generated for the new location, making it accessible for selection in the roast editing screen.
You can also add the location directly when you are adding new lots to your Green Inventory.
Editing a location
By following the steps below, you can edit a location:
- Log in to the online platform C-sar.
- Navigate to More on the main menu bar and select Locations.
- Locate the Location name you wish to edit.
-
Click on the
-png-1.png) Edit icon on the right side of the page.
Edit icon on the right side of the page.
-
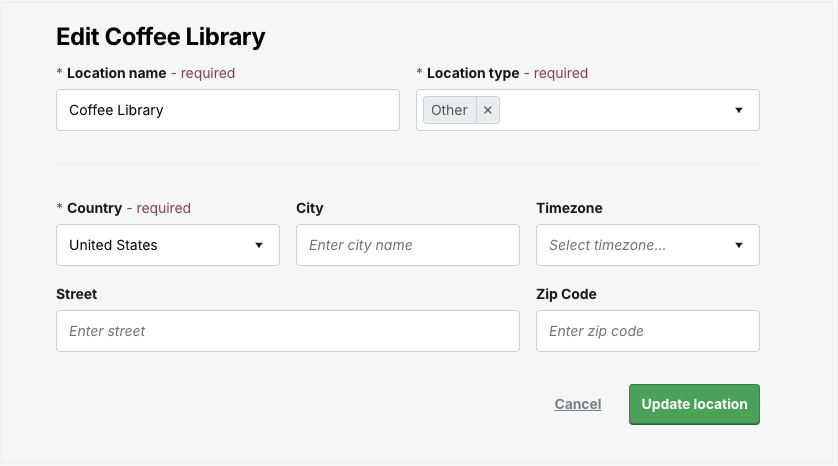
You can edit the following details:
* indicates mandatory fields- *Location name
- *Location type: You can assign more than one location type to a single location.
- *Country
- City
- Time zone
- Street
-
Zip Code

- Click Update location to finalize the changes.
Deleting a location
By following the steps below, you can delete a location:
- Log in to the online platform C-sar.
- Navigate to More on the main menu bar and select Locations.
- Locate the Location name you wish to delete.
-
Click on the
-png.png) Delete icon on the right side of the page.
Delete icon on the right side of the page.
Locations with an active espresso machine are not deletable.
Deleting a location with an active espresso machine will trigger an error message. This measure prevents the loss of critical data associated with that location.
Congratulations! You are now ready to set up and manage your Locations.
Your opinion matters. If you have further questions, feedback, or concerns, please submit a support ticket directly from support.cropster.com.