
This article will explain how to create Orders manually.
Products
If you have a Shopify, WooCommerce/Beans shop, your products will be created in the course of the shop connection:
- Setting up the Shopify integration for Commerce
- Setting up the WooCommerce/Beans integration for Commerce
If you want to use the Commerce module without shop integration:
Orders
If you have a shop integration set up, your orders will automatically be added to Cropster when syncing the shop.
You can add orders manually if you do not have a shop connected to Cropster.
Creating Orders
By following the steps below, you can manually create Orders:
- Log in to the online platform C-sar.
- Navigate to Commerce on the main menu bar.
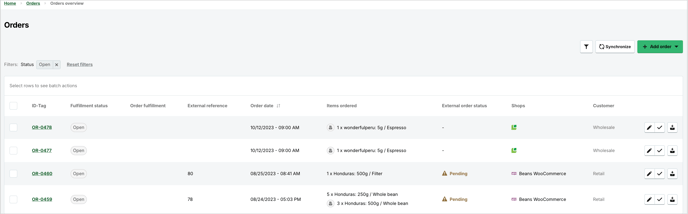
- Select Orders. You will be directed to the Orders overview page.
- Click + Add Order > Order top right.

- Enter the following details:
* is indicating mandatory fields
- External Reference: Enter an external ID number, e.g., from your online shop.
- Date*: Enter the date.
- Time*: Enter the time.
- Customer type: Choose the customer type (Wholesale or Retail).
- Customer: Name of the business/person who placed the order.
- Sales person
- Enter the Ordered products:
* is indicating mandatory fields
- Product*: Choose the product/bundle variant.
💡The product name and variant (SKU) or the bundle name (SKU) will be displayed in the field. - Quantity*: Enter the ordered amount.
- Product*: Choose the product/bundle variant.
- Add another product by clicking the + Add product button.
- By clicking on the Create & add new button you can save the order. This step will save the order and also opens a new "Add order" page.
- When you are done, click Create order to submit.
- Your orders are now visible on the Orders Overview page.
💡 Each order receives an individual ID-Tag starting with OR.
The Orders detail page
By clicking on the OR-tag, you will be navigated to the Orders detail page.

You can view the General details of your selected Order:
- Status
- Order date
- Created at
- External reference
- Customer type
You can also view the details of the products that have been ordered at the Ordered products section:
- Product
- Variant
- SKU
- Lot name
- Quantity
The following actions can be completed via the Orders detail page:
- By clicking on the
-png-2.png?width=16&height=16&name=EditIcon%20(1)-png-2.png) Edit icon: You can edit your Open Orders.
Edit icon: You can edit your Open Orders. - By clicking on the
-png.png?width=16&height=16&name=ArchiveIcon%20(1)-png.png) Archive icon: You can archive your Orders.
Archive icon: You can archive your Orders. - By clicking on the green Fulfill button, you can create an Order Fulfillment.
If there are any products in the Order that have not been reviewed yet, the Fulfill button will not be available for use.
Editing Orders
You can only edit Orders with the status 'Open'.
By following the steps below, you can edit Orders with the status 'Open':
- Complete steps 1-3 written above.
- Navigate to the Edit icon on the right side of the page, at the Order you wish to edit.

- You will be directed to the Edit Order page.

- You can edit the following details:
* is indicating mandatory fields- External Reference: Enter an external ID number, e.g., from your online shop.
- Date*: Enter the date.
- Time*: Enter the time.
- Customer type: Choose the customer type (Wholesale or Retail).
- Customer: Name of the business/person who placed the order.
- Sales person: Enter a Sales person.
- Product*: Choose the product/bundle variant.
💡The product name and variant (SKU) or the bundle name (SKU) will be displayed in the field. - Quantity*: Enter the ordered amount.
- Add another product by clicking the + Add product button.
- Click on Update Order to submit the changes.
📚 Learn how to create an Order Fulfillment plan.
Filtering Orders
By following the steps below, you can easily filter your Orders via the Orders overview page:
- Log in to the online platform C-sar.
- Navigate to Commerce on the main menu bar.
- Select Orders. You will be directed to the Orders overview page.
- Click on the
 Filter icon on the top right side of the page.
 - The following window will pop up on the right side of the page:

- You can filter your Orders according to the following criteria:
- ID-Tag
- External reference
- A specific timeframe by entering the start and end dates for the Order date.
- Status
- By toggling the 'Include archived Orders' button green, you can also include your archived Orders.
- Click on Apply filters.
💡 The number of results will be shown on the left side of the Filter window. By clicking on Reset filters, you can enter new criteria.
Related content
Congratulations! You are now ready to set up the Orders module.
Your opinion matters. If you have further questions, feedback, or concerns, please feel free to reach out by submitting a support ticket directly from support.cropster.com.