
This article will explain how to manage your Brew Recipes and create multi-location Recipes.
You need to have the Group Administrator's permission to perform the steps outlined in this article.
This article is relevant once you have successfully created your initial set of Recipes.
The Recipes overview page
Only Cafe Managers (Group Administrators) are permitted to view draft and archived Recipes.
By following the steps below, you can navigate to the Recipes overview page:
- Log in to the online platform C-sar.
- Navigate to Cafe on the main menu bar. You will be directed to the Cafe Operations page.
- Navigate to the Telemetry Insights tab and select Recipes.

- You will be directed to the Recipes overview page.
Learn how to create new Recipes.
- The following details are displayed:
- Status
- Name
- Brewing method
- Brewing device
- No. (Number) of shots
- Location
- Dose
- Yield
- Brew ratio
- Time
- Temperature
- Select the Recipe's name to view its details.
The Recipe details page
Within the Recipe's details page, you will find a comprehensive layout showcasing all the details and Brews associated with the selected Recipe:

- Recipe details
- Brew log
- References: Logging your Brew as a Reference will update the Recipe's Brew parameters. We will then copy its input parameters to subsequent Brews captured under the same Recipe (until the Reference is updated); it will become the new brewing standard for this Recipe for this station.
- Brews
- Brew Compare Report
You can also select what information should be displayed at the Brew log References table by clicking on the dropdown next to Customize.
The Brew log
Scrolling down on the Recipe's details page will allow you to access the Brew log section.
Within the Brew log section, you will find two tabs:
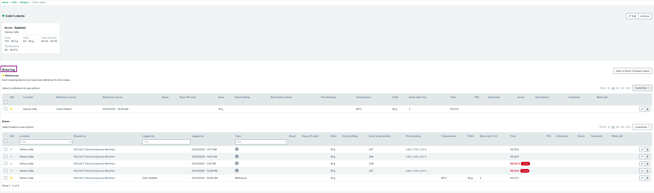
- References
Each Brewing device can have one designated Reference associated with the Recipe. - Brews
Editing Recipes
You can edit the Recipes via the following pages:
Via the Recipes overview page
By following the steps below you can edit your Recipes via the Recipes overview page:
- Navigate to Cafe on the main menu bar. You will be directed to the Cafe Operations page.
- Navigate to the Telemetry Insights tab and select Recipes.
- Click on the
-png-2.png?width=16&height=16&name=EditIcon%20(1)-png-2.png) Edit icon on the right side of the page at the Recipe you wish to edit.
Edit icon on the right side of the page at the Recipe you wish to edit.
- You will be directed to the Edit Recipe page.
The Brewing method can not be edited.
- Click on Update recipe to finalize the changes.
Via the Recipe's details page
By following the steps below you can edit your Recipes via the Recipes overview page:
- Navigate to Cafe on the main menu bar. You will be directed to the Cafe Operations page.
- Navigate to the Telemetry Insights tab and select Recipes.
- Click on the Name of the Recipe. You will be directed to the Recipe's details page.
- Click on the Edit icon on the top right side of the page.

- You will be directed to the Edit Recipe page.
The Brewing method can not be edited. - Click on Update recipe to finalize the changes.
Recipe Statuses
A Recipe can have three statuses:
- Active: It requires a Reference, and it will be available on the Cafe dashboard. An active Recipe can be archived, but it cannot go back into draft mode.
- Archived: iIt s not visible on the Cafe dashboard. However, the Recipe and its Brews are still accessible to Cafe Managers from the Recipes overview page. An archived Recipe can be activated to become an active Recipe again.
- Draft: Only visible to Cafe Managers and a reference can be set, but is not required. A draft recipe can be activated.
By following the steps below you can change the Recipe's status:
- Find the Recipe that you wish to change the status for.
- Click on the dropdown next to the Status.

- Select the new Status.
Draft and active Recipes can be archived.
Archiving a recipe will remove it from the dashboard for all locations, and also archives the Recipe's References.
However, the Recipe and its Brews are still accessible from the Recipe's detail page.
Learn more about the Recipe statuses.
FAQs
Can I delete Recipes?
Yes, you can by following the steps below:
- Navigate to the Recipes overview page.
- Locate the Recipe you wish to delete.
- Click the
-png-2.png?width=16&height=16&name=DeleteIcon%20(1)-png-2.png) Delete icon on the right side of the page.
Delete icon on the right side of the page. - A confirmation window will appear, prompting you to verify your decision to delete the Recipe.
- Click Delete to finalize it.
Keep in mind that once you delete a Recipe, this action cannot be undone.
Related content
Congratulations! You are now ready to manage Recipes and References to consistently make better coffee.
Your opinion matters. If you have further questions, feedback, or concerns, please submit a support ticket directly from support.cropster.com.