
This manual walks you through the setup of Cropster's AmbientSensor.
Requirements
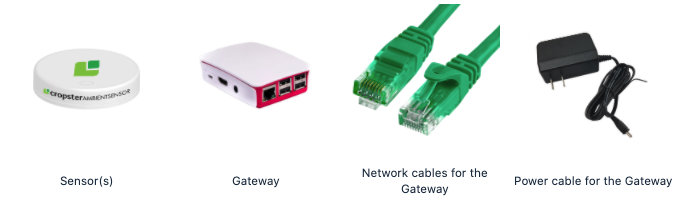
Along with a working Internet connection, make sure that you have the following equipment:
AmbientSensor setup
Let's get started! First, you need to install the hardware and register your sensor within the Cropster online platform.
You can connect your AmbientGateway to your Cropster account using either of the two options:
Alternatively, you can follow the instructions in this video:
Connecting AmbientGateway via an Ethernet cable (preferred)
- Connect the Ethernet cable from an Ethernet port on your router to the Ethernet port on the AmbientGateway. It is important to connect the Ethernet cable before powering on the AmbientGateway.
- Plug your AmbientGateway into a power source using the provided power cable. Allow a couple of minutes for the AmbientGateway to finish booting, and then proceed with the next step.
- Log in to the Cropster online platform and go to the Locations setup page to register your sensor with your Cropster account.
- Follow the instructions presented in your Cropster account to set up your sensor.
- Once you have completed the setup in Cropster and you see your sensor(s) on the Locations detail page, take your sensor(s) to the locations you've specified. Place them in a safe spot where they will not be accidentally moved or obstructed.
Connecting AmbientGateway using WiFi
You can only connect the AmbientGateway via WiFi for WiFi networks where the SSID is not hidden. If the WiFi network that you intend to use is not visible, AmbientGateway will not be able to connect to it.
- Before starting the setup using WiFi, ensure that the AmbientGateway is powered off and that it is not connected to the router via an Ethernet cable.
- Plug your gateway into a power source using the provided power cable. Allow a couple of minutes for the AmbientGateway to finish booting, and then proceed with the next step.
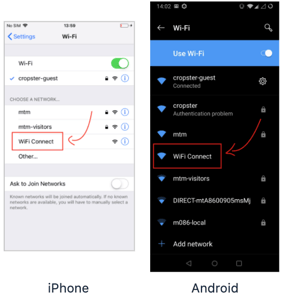
- Open the WiFi network settings of your smartphone, tablet or computer in close proximity to the AmbientGateway.
- Select the WiFi Connect device access point.
- After connecting to the access point, it will open a web page. Opening any web page will redirect to the same website. In some cases it is possible that your WiFi SSID shows up more than once, just select any and continue.
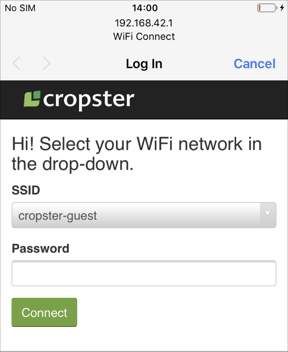
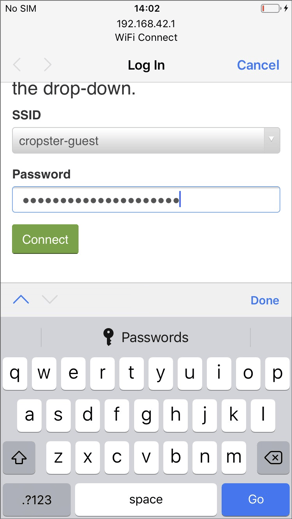
- Enter local WiFi network credentials for the selected network.
- The gateway will connect to the WiFi network. When the network credentials have been entered, the gateway will disable the access point and try to connect. If the connection fails, it will reenable the access point for another attempt. If it succeeds, the configuration will be saved and you don't have to enter it again.
If you would like to switch from using Ethernet to using WiFi and vice versa, this is possible, but in order to do so, please make sure to first power off the AmbientGateway by unplugging it, and then follow the setup steps for the desired connection type as described above.
Tracking environmental conditions of roasted batches
Aside from being able to collect real-time environmental data in your green coffee inventory, you can also keep track of the starting conditions of each roast batch. All you need to do is to have the Gateway registered to the same location as the roast machine.
At the moment we pick the first sensor - topmost in the table displayed in a Location - as the one that to collect the environmental data for the roast machines. Generally, if you do not delete it, it's the first one you register.
By following the steps below you can make sure that your roast machine is set to the same location:
- Log into the online platform C-sar.
- Navigate to
 Settings and select Machine.
 - Click the Edit button for the corresponding machine.
- Select the location where you have registered the sensors from the Location dropdown.
- Click Update machine.
Good to know
- Your sensors and gateway talk regularly. Make sure they are within 30m (100 ft) of each other to ensure a stable connection.
- Your sensor can notify you when things change! Simply set a range for a location in the online system. That range then applies to all sensors in the location. You can also set up alerts. That way, you will be notified if something changes. You will receive updates with the Daily Roast email digest.
- Based on ISO standards, we recommend checking if the storage temperature is between 6.5ºC (43.7F) and 22ºC (71.6F), and if humidity is between 41% and 58%.
- To ensure the longevity of your equipment, keep your sensors at temperature levels between -20ºC (-4F) and 65ºC (149F).
Congratulations! You are now ready to set up Cropster's AmbientSensor.
Your opinion matters. If you have further questions, feedback, or concerns, please feel free to reach out by submitting a support ticket directly from support.cropster.com.