
This manual explains how to install the BrewBeacon on your espresso machine.
Beta means that the features are being tested with a select group of users to help us identify minor flaws under everyday conditions that we cannot reproduce internally. Therefore, it will be necessary that you share feedback with us and let us know whenever you come across some unexpected behavior. If you want to participate in beta testing, please email to sales@cropster.com.
By installing the BrewBeacon, the user agrees to release Cropster from any liability and assumes any possible risk related to the use of the device/software. Cropster's terms of service apply.
Cropster BrewBeacon is designed and engineered to be fully installed within a volumetric espresso machine. It connects to the solenoid valve and the flow meter of up to 4 groups. For espresso machine compatibility, get in touch with Cropster Support.
- What's in the Box?
- Pre-Installation Steps
- Installation
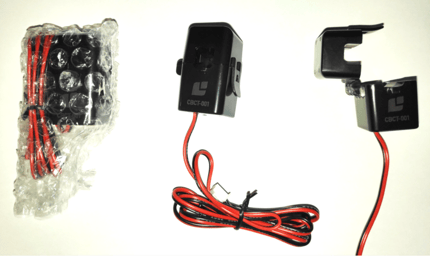
What's in the Box?
The BrewBeacon Bundle contains the following parts:
- The BrewBeacon
- Solenoid Sensor
- Flow meter Connectors for 4 different flow meter types
- Flow meter Connection Wires
- T-connectors
Pre-Installation Steps
- Familiarise yourself with the espresso machine model in which Cropster BrewBeacon will be installed, and keep the machine manual on hand.
- Check Cropster BrewBeacon and all its components. Only proceed with installation if all components are visibly intact. Contact Cropster Support otherwise.
- Ensure a well-lit and dry environment with enough space.
- Gather the tools you'll need, including:
- Tools required to open and close your espresso machine, according to your espresso machine's manuals.
- Cable ties
- If external power is required or desired, a micro-USB power adapter (see Power supply)
- Turn off the espresso machine and disconnect it from the power supply.
Installation
1. Open espresso machine
To install Cropster BrewBeacon, you first need to gain access to your espresso machine’s group solenoid valves and flow meters.
Consult your espresso machine’s manuals and instructions to determine:
- Which parts of the machine you need to open or disassemble
- Which tools you need (usually a set of allen keys and phillips screwdrivers)
- How to open the machine
Carefully follow the steps laid out in these manuals to open your machine.
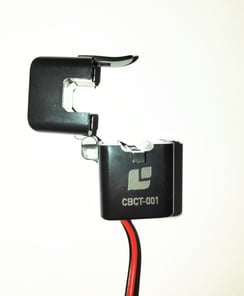
2. Install Solenoid Sensors (CBCT)
The Solenoid Sensor measures current flowing to a group’s solenoid valve by attaching to one of its power supply wires.
Solenoid Sensor CBCT-001
In case of DC solenoid, do not install the solenoid sensor.
The following steps need to be repeated for every group.
1. Locate your solenoid valve
- The group's solenoid valve is usually the solenoid valve closest to the brew group itself and is usually a three-way valve.
- Identify the wires going to and from the group's solenoid valve. Take note of the number and the colors of the wires going to each group's solenoid valve.
- If there are two wires going to the solenoid valve, you can connect to either of them. We suggest to choose the wire that has more slack and is more easily accessible.
- On some machines, there are more than two wires going to the solenoid valve. In this case, choose the odd wire out that doesn’t share a color with the other wires.
2. Fit the Solenoid Sensor around the chosen wire and close it

![]()
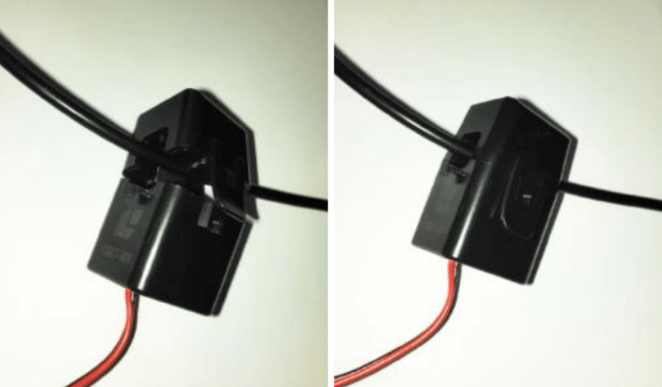
Pay attention to the sound it makes when closing the sensor. There should be two audible clicks. Don’t use force to close the sensor.
In some machines the solenoid sensor is not touching the cable, this is completely normal.
Make sure to keep the sensor and its cable away from heat sources and parts that can get hot when the espresso machine is on.
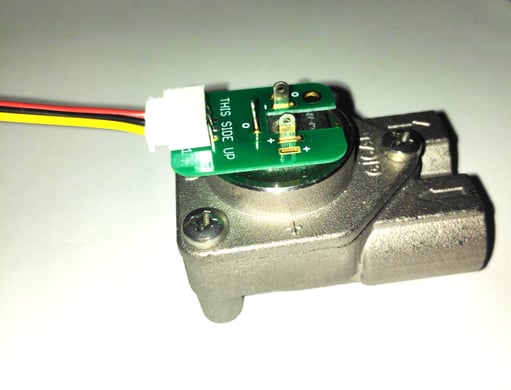
3. Install Flow meter Connectors (CBFC)
Cropster BrewBeacon connects to the espresso machine’s flow meters to track water volume. The electrical connection is established in parallel to the existing connections in the machine.
Cropster BrewBeacon supports four commonly used types of flow meters. The following steps will guide you through identifying the correct Flow meter Connectors for your machine and connecting them.
For machines with non-standard flow meters, Cropster BrewBeacon comes with a set of generic T-connectors. Get in touch with Cropster Support for more information on machine compatibility and installation instructions.
The following steps need to be repeated for every group.
1. Identify Flow meter Type
Locate your group's flow meters and take a close look to identify their type. Figures below show four compatible flow meter types. The brand may be different than the ones shown, of relevance is the type of connection. For each type, the appropriate Cropster BrewBeacon Flow meter Connector is depicted next to it.
Flow meters Type 1 and Type 2 are very easily mixed up. Pay special attention to the polarity markings (highlighted in the pictures) on these types!
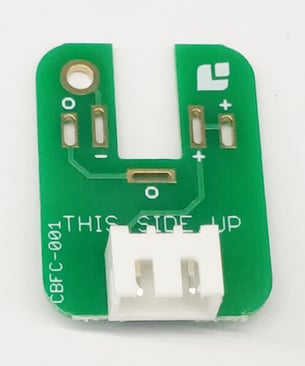
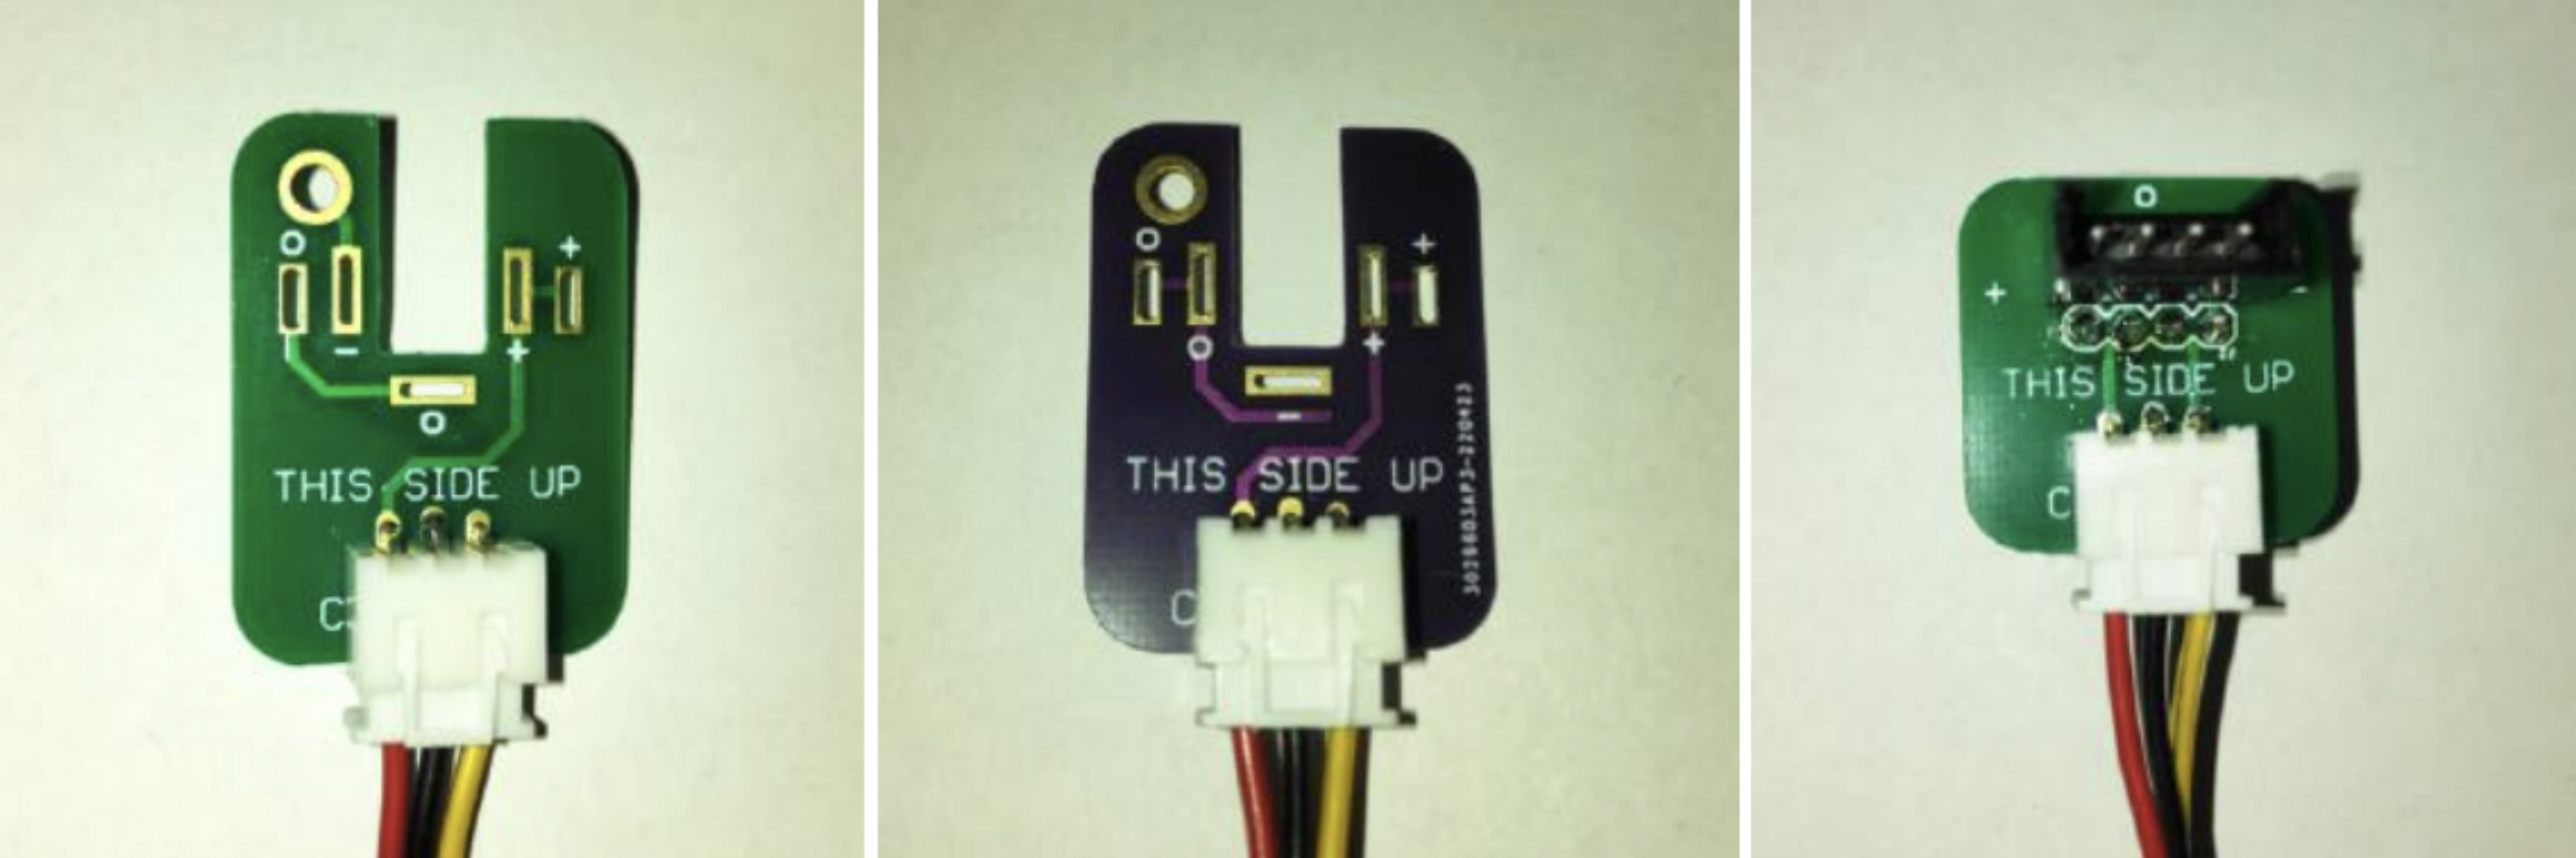
Flow meter Type 1: CBFC-001 (green)
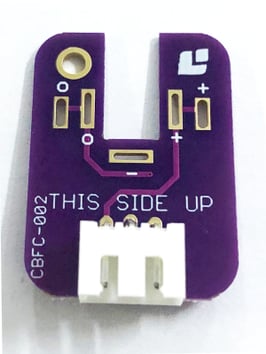
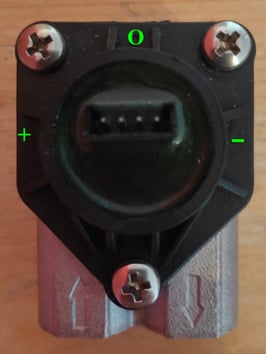
Flow meter Type 2: CBFC-002 (purple)
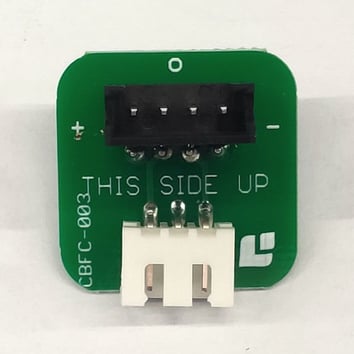
Flow meter Type 3: CBFC-003
Flow meter Type 4: CBFC-001 (green)
-png.png?width=285&height=342&name=CBFC-001%20(1)-png.png)
2. Prepare cables and connectors
After identifying the correct Flow meter Connectors, unpack these connectors and remove the cable tie from the flow meter wires. Plug one end of each cable into one of the connectors and lay the wires out on a flat surface. Repeat this step for every group.
CBFC-001, CBFC-002, CBFC-003:
3. Install connectors
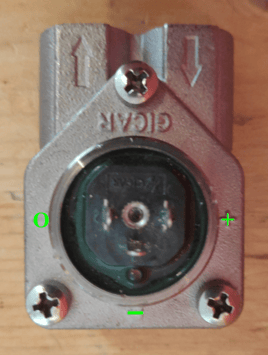
Flow meter Type 1 (Connector CBFC-001)
If you have an espresso machine with Flow meter Type 1, follow these steps for every group.
- Disconnect the espresso machine’s connector from the flow meter, utilizing a phillips screw driver to unscrew. Be careful not to lose the screw. NOTE: Consult your machine’s service manual for more information on safely undoing its flow meter connectors.
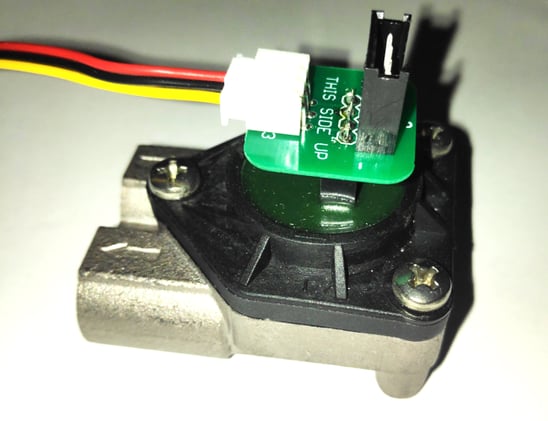
- Carefully slide the green Cropster Flow meter Connector (CBFC-001) onto the pins protruding from the flow meter. The connector slides on with little resistance. Do not apply excessive force and make sure the markings on the connector line up with the corresponding polarity markings on the flow meter. Ensure that the writing ”THIS SIDE UP” is facing away from the flow meter and can be read when the connector is in place.
- Reconnect the espresso machine's connector by following the steps you took to undo it in reverse order. Be careful not to over-tighten the screw.
CBFC-001 on Flow meter Type 1
After completing these steps for every group, go on to "Install Cropster BrewBeacon"
Flow meter Type 2 (Connector CBFC-002)
If you have an espresso machine with Flow meter Type 2, follow these steps for every group.
- Disconnect the espresso machine’s connector from the flow meter, utilizing a phillips screw driver to unscrew. Be careful not to lose the screw.
NOTE: Consult your machine’s service manual for more information on safely undoing its flow meter connectors. - Carefully slide the purple Cropster Flow meter Connector (CBFC-002) onto the pins protruding from the flow meter. The connector slides on with little resistance. Do not apply excessive force and make sure the markings on the connector line up with the corresponding polarity markings on the flow meter. Ensure that the writing ”THIS SIDE UP” is facing away from the flow meter and can be read when the connector is in place.
- Reconnect the espresso machine's connector by following the steps you took to undo it in reverse order. Be careful not to over-tighten the screw.
CBFC-002 on Flow meter Type 2

After completing these steps for every group, go on to "Install Cropster BrewBeacon"
Flow meter Type 3 (Connector CBFC-003)
If you have an espresso machine with Flow meter Type 3, follow these steps for every group.
- Disconnect the espresso machine’s connector from the flow meter. It unplugs without tools, just carefully pull on the connector until it comes loose.
NOTE: Consult your machine’s service manual for more information on safely undoing its flow meter connectors. - Carefully plug the Cropster Flow meter Connector (CBFC-003) into the flow meter’s receptacle. The connector plugs in with little resistance. Do not apply excessive force and make sure the markings on the connector line up with the corresponding polarity markings on the flow meter. Ensure that the writing ”THIS SIDE UP” is facing away from the flow meter and can be read when the connector is in place.
- Reconnect the espresso machine's connector by carefully plugging it into the Cropster connector.
CBFC-003 on Flow meter Type 3
After completing these steps for every group, go on to "Install Cropster BrewBeacon"
Flow meter Type 4 (Connector CBFC-001)
If you have an espresso machine with Flow meter Type 4, follow these steps for every group.
- Disconnect the espresso machine’s connector from the flow meter, by carefully undoing the two outer tab connectors with a pair of pliers.
NOTE: Consult your machine’s service manual for more information on safely undoing its flow meter connectors. - Carefully slide the green Cropster Flow meter Connector (CBFC-001) onto the pins protruding from the flow meter. The connector slides on with little resistance. Do not apply excessive force and make sure the markings on the connector line up with the corresponding polarity markings on the flow meter. Ensure that the writing ”THIS SIDE UP” is facing away from the flow meter and can be read when the connector is in place.
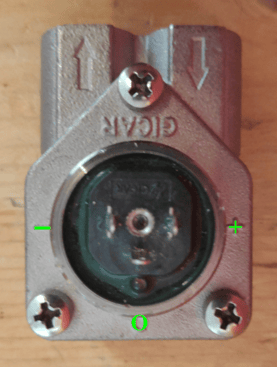
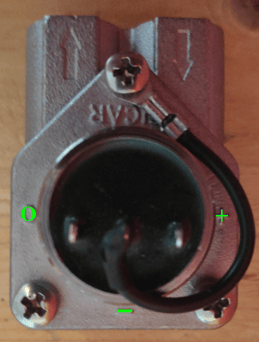
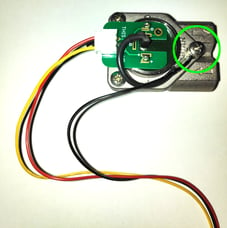
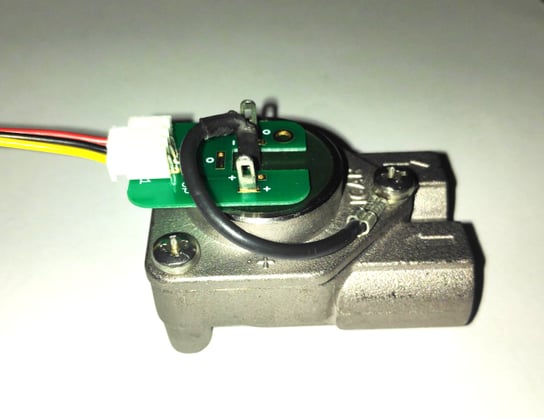
- Establish a ground connection between BrewBeacon and the espresso machine. To do this, take the black wire connected to the CBFC-001 connector, cut it off close to its connection point, and carefully strip it. Then firmly connect the stripped wire to the espresso machine’s metal housing in a secure way.
A convenient place to do this is the flow meter’s own ground connection as seen in the pictures below. Partly undo the marked screw, clamp the stripped black wire under it, and firmly tighten the screw again.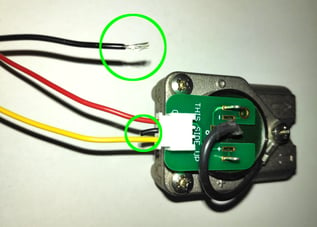
- Reconnect the espresso machine's tab connectors by following the steps you took to undo it in reverse order.
The ground connection needs to be established on ONE group only. There is no need to repeat this particular step for other groups.
CBFC-001 on Flow meter Type 4
After completing these steps for every group, go on to "Install Cropster BrewBeacon"
4. Install Cropster BrewBeacon
With the Solenoid Sensors and the Flow meter Connectors in place, it’s time to install Cropster BrewBeacon in the espresso machine!
1. Power supply
With most espresso machines, the machine’s internal power supply also supplies Cropster BrewBeacon through the flow meter connectors.
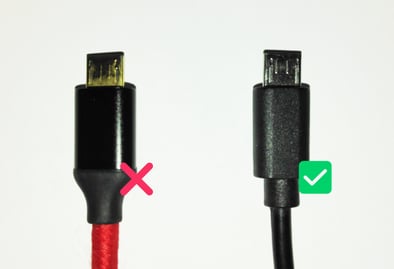
For machines that do not supply enough power on the internal rails, or if it is for some reason undesirable to tap into the espresso machine’s power supply, Cropster BrewBeacon can be powered supplied via its Micro-USB port from an external +5 V DC USB power supply. When Cropster BrewBeacon is supplied externally, no current is being drawn from the espresso machine’s power rails.
You can use a standard micro-USB phone charger or similar adapter (not supplied).
The USB cable must not have a metallic connector housing, and ensure it is long enough to reach a nearby socket.
Beta testers
We encourage you to first try to install BrewBeacon without external supply. If this doesn't work, eg. if LED light I is not continuously ON, or if you get a flow meter error on your machine, then turn your machine back off, connect external supply, and turn your machine back on. All other cables can remain in place.
If you’re unsure whether you need an external power supply for Cropster BrewBeacon, get in touch with Cropster Support.
2. Mounting Cropster BrewBeacon
Determine a location where to place Cropster BrewBeacon inside the machine. Good options are:
- Close to the machine’s processor/control unit
- Away from heating elements, hot metal parts, and water
- With ample space to run cables and close the machine’s housing
Cropster BrewBeacon is equipped with magnets, so that it can be neatly placed on
metal backplates inside of the machine. Alternatively, fasten it by the mounting holes using cable ties or screws. If there is no other option, you can simply lay the device down inside of the machine.
Depending on your chosen mounting location, it may be easier to proceed with the next steps Connecting the cables and Verify power supply, prior to actually mounting or securing the BrewBeacon in the machine.
3. Connecting the cables to Cropster BrewBeacon
Follow these steps to neatly route Cropster BrewBeacon’s cables inside the machine:
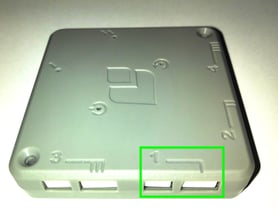
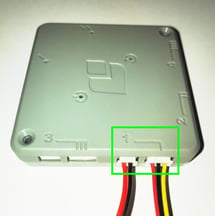
- Identify Solenoid Sensor cable and Flow meter Connection wire connected to group 1 (left-most brew group).
- Run the two cables towards the position where you will mount Cropster BrewBeacon. Pay attention to run the cables along other wiring in the machine and away from hot surfaces.
- Loosely fasten the cables to the machine or other wiring in a few locations with cable ties.
- Pull the cables towards Cropster BrewBeacon leaving a little slack.
- Connect the two cables to Cropster BrewBeacon’s Group Input 1.
- Use a cable tie to neatly tie together excess cable length close to Cropster BrewBeacon.
- Repeat these steps for the other brew groups, one after another, until all cables are securely connected.
If using an external power supply as determined in a previous step, route the Micro-USB cable (not supplied) into the machine. Connect the Micro-USB cable to Cropster BrewBeacon and loosely fasten it in a few locations with cable ties.
5. Double-check installation
Before finishing the installation, take a moment to check all connections, wires, and other parts of Cropster BrewBeacon. Check for the following:
- Solenoid Sensors are properly closed and are not touching hot metal parts.
- Flow meter Connectors are the correct type (polarity markings on flow meters and connectors match) and are firmly connected.
- The machine’s flow meter connectors are reconnected properly.
- All Cropster BrewBeacon cables are firmly connected and routed along machine wiring and are not touching hot metal parts.
- The cables from each group’s Solenoid Sensor and Flow meter Connector are pairwise connected to the same Cropster BrewBeacon Input Group.
- Cropster BrewBeacon is mounted in a dry place and not exposed to direct
heat.
If you have doubts about the correct installation, get in touch with Cropster Support.
6. Verify power supply
To verify that BrewBeacon is adequately powered, follow these steps:
- Connect the espresso machine’s power supply. If using, connect the Cropster BrewBeacon external USB power supply.
- Turn the machine on.
- Verify that BrewBeacon LED light I is continuously ON.
- Verify that BrewBeacon's network comes on by checking for available WiFi networks (on your phone or other device). You should notice a network called BrewBeacon XXXXXX (with the last 6 characters being the device’s ID).
- Turn machine back off, and disconnect power supply.
- If LED light I is continuously on and you see BrewBeacon's network, continue with Close the espresso machine.
If not, go back to Double-check installation, or use external Power supply (if not yet using).
Be very cautious not to touch any components inside the machine while it is powered!
7. Close espresso machine
Ensure the machine is turned off and disconnected from power supply before continuing.
- Follow the espresso machine manufacturers’ maintenance manuals or service instructions to close the machine. Alternatively, perform the steps to open the machine in reverse order. Pay attention to not clamp any Cropster BrewBeacon cables when closing the espresso machine.
- Connect the espresso machine’s power supply. If using, connect the Cropster BrewBeacon external USB power supply.
For further details on the installation of the BrewBeacon, please find the official Product Manual here.
Congratulations! You have successfully installed the Cropster BrewBeacon!
Check out how to connect your espresso machine to Cropster Cafe and enjoy tracking your first brews!
More manuals can be found on help.cropster.com